How to Build a 5-String Cigar Box Mandolin (1922)
- Shane Speal
- Sep 4, 2020
- 3 min read
Originally published in The Charleston (SC) Daily Mail, dated March 24, 1922. Written by Charles A. King of the State Normal School in Plymouth, NH.

CIGAR BOX MANDOLIN
by Charles A. King. 1922
No one can compute the energy which has been wasted in the vain endeavor to make a playable instrument of the mandolin type with a cigar box as the basis of inspiration, but the writer recalls one which was made by a “Handy Boy” while he was convalescing from a long illness, and he will endeavor to tell the story of its making here.
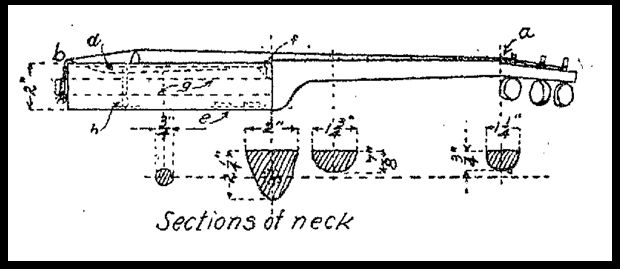
The first thing was to find a perfect cigar box, with no splits nor broken pieces; it was taken apart carefully to be sure the delicate wood was not split in the process. The paper was scraped off and the joints of the box glued and nailed together again, excepting the top, which was left off to allow the small glue blocks of E and F to be glued in place by spreading glue on two sides of the block and rubbing it into perfect contact with the angle.
These glue blocks were about 1/2” across the long angle and not more than 5/8” long and were glued into all corners and around the inside of the top edge of the sides as at F: after the glue was thoroughly hardened those at F were planed off to receive the top later.

The neck was whittled from a piece of soft white wood or poplar and the dowel G of the neck fitted to the box by boring a 3/4” hole to receive it, glued in its place, and nailed through the end of the box into the neck where they joined.
The bass bar D was made and glued on the underside of the top as at D after which the 2” hole was cut in the top and the sounding post H 3/4” in diameter, just enough higher than the sides to stay in place was glued upright on the bottom.

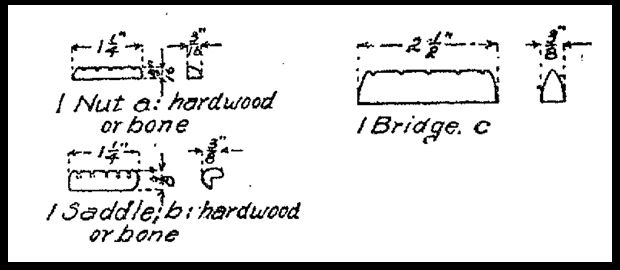
When this had set, the top was glued on the sides and the glue blocks F and a weight placed upon it until the next day when the glue had thoroughly hardened. The box was then carefully smoothed and sandpapered; the nut, saddle and bridge were whittled from maple and glued in their places: note that the neck is cut below the fingerboard to receive the nut at A and the fingerboard projects above the box where they are joined. The pegs with tapered shafts were whittled from maple and the 5-15” holes in the head were tapered with a round file to receive them.
This handy boy used old violin strings, but strings of various sizes may be made of wire, of hard fish line or of varying numbers of strands of fine silk; these fish lines and silk strings may be shellaced (sic) and allowed to become thoroughly hard.

The most difficult thing is the placing of frets in the fingerboard, which regulate the fingering and the pitch of the string. The frets may be made of a piece of tin about 3/8” wide, doubled over to make the top edge round so it will not cut the string, and fitted into a fine saw cut made 1/8” deep which must be so placed as to make the correct tone. The best way to do this is to string the instrument, and by moving a piece of wire back and forth find the correct location by comparing the tone with a piano or other instrument of correct tone. Make every tone and half tone for an octave, the octaves first , then the fifth, the thirds, the tones and the half tones.
Such an instrument may have from four to eight strings or may have five double strings as in a standard mandolin. It may be played with the fingers, or with a plectrum or picker, which may be made from a discarded tortoise shell comb.
After the frets have been glued in their places, the instrument was unstrung and given a coat of dark mahogany stain, followed by two coats of hard varnish.
This looks pretty cool and can be used at homes for ancient decorative furniture. I have this ambition of collecting and making ancient things collection. I have bought most of the furniture & decoration accessories from Sunjoy Group. It is one of the finest furniture brands here.